

What is the Portfolio Project?
The Portfolio Project is designed to assist NVPS members in developing a cohesive collection of images suitable for presentation to art directors at display venues, as well as to friends and family. All members are encouraged to join the project regardless of their level of experience. Specifically, this is not a competition, everyone’s work is reviewed individually and not compared to the work of anyone else in the group. The project is designed to help each person hone their skills and learn the art of self-critique. In all cases these should be your best images.
The project runs from September to May. There will be a mid-project review to offer suggestions, and a final review in May where participants will present their finished images.
Members will work on identifying a theme, writing an Artist Statement and compiling their best images to support their theme. Previously made images are allowed, but participants are also encouraged to add new work to their portfolios.
Portfolios in progress are kept in a private group gallery on Dropbox, accessed only by participants. After the final review the gallery will be transferred to the club website. Past portfolios are available for viewing at https://nvps.smugmug.com/NVPSGallery/PortfolioProject. Members who are thinking of joining the Portfolio Project are strongly urged to look through the past portfolios. Doing so will give a good idea of how other people had developed their theme and presented images that worked together as a whole concept.
Choosing a Theme
Choosing a concept is the first step and some people have started with more than one idea. As the project progresses it is usually obvious that one concept is stronger or more appealing and will take precedence. Visit the club’s Portfolio Project gallery to see what other people have done over the years. The subjects have varied greatly, but what will stand out is that there is a cohesiveness to each collection following the theme. After choosing a theme the next step is to craft an Artist Statement.
Composing Your Artist Statement
This step is essential! The Artist Statement tells the viewer your intent in making the portfolio and is where you tell why you are interested in the subject. It is not a biography. Nor is it used to list your equipment, unless your purpose was the exploration of a particular lens, such as a fisheye, or camera type, such as a pinhole or cell phone. Most viewers will lose interest in an artist statement that is more than one or two paragraphs long and will just skip to the images. Make your narrative short and concise, just concentrate on what and why. Preferably leave out references to the project or the club as your reason for the collection, make this about you and your work. Read the statement out loud to see how it sounds; and find someone else to read it and tell you what they think. There are good articles on writing an Artist Statement here: How to Write an Artist’s Statement by Melissa Wotherspoon and The Artist Statement reprinted from Lenswork Issue #103, Nov-Dec 2012.
Your Purpose Will Dictate the Final Presentation
You could be doing this project purely for experience and for personal growth as a photographer. You could be thinking about images for gifts to friends and family, for a holiday calendar or coffee table book to display, or for quality images to hang on your walls. This will dictate your final project presentation, consider prints, book, poster or digital display.
If you are thinking about using the project to develop a professional folio for advertising and presentation to galleries, you will want to differ your approach somewhat. You can present your images as prints in a presentation box, or as a folio. A cohesive presentation will be foremost, images should have the same orientation, both portrait and landscape orientation are okay, but the two should be grouped separately. And images should be sized so that at least one side of the images is equal and with framing as opposed to being printed edge to edge. For instance, if your folio size is 11X14 you could size the images at 8X11 and increase the canvas sizes to 11X14, giving the images a uniform border. In a professional folio of your best images it is reasonable to have different subject matter, if so, the images should be arranged in galleries as opposed to being mixed together. You should be able to update your folio, changing images as you grow as a professional, so choose a folio where pages can be added over time.
The Reviews
An intermediate review will be held mid-project where each participant will have their images projected during a club meeting and the reviewer, either individual or panel, will offer suggestions as to the direction and effectiveness of the artist statement and images. As there can be a large group participating there will only be time to show 12 to 15 images from any one person. As stated before, this is not a competition, it is a learning experience. Each portfolio is addressed individually. The same format is used for the final review and each participant will bring in their final project to share.
Sign-up
Contact the project project coordinator at the club meetings or via email to sign-up or for additional information. Their contact information is shown in the “Board Contacts” page. In order to participate in the Portfolio Project, you will need to create a Dropbox account and send the exact email in which that account was created to the project coordinators. They will then setup a folder for you in the NVPS Dropbox account and share it with you. Specific Dropbox instructions will be emailed to you once you sign-up.
Image Sizing and Format
Please note that your images must be correctly sized for displaying on the NVPS projector and in the Portfolio Project gallery. Image sizes (in pixels) must be no greater than 1400 pixels (horizontally) and 1050 pixels (vertically). The resolution can be any number between 72 – 200 (pixels/inch) with a recommended value of 127. All images, INCLUDING THE ARTIST STATEMENT, must be submitted as JPG images. Size your images the same way as digital images uploaded for the digital competition: https://nvps.org/home/digital-competition-information/.
Your final printed portfolio should be sized larger to maximize print quality. Typically, printed images have a resolution of 300 pixels/inch.
Renaming Your Files – Important!
In order for your images to appear in the correct order, you should prefix your image filenames with the numbers: 00, 01, 02… etc. Do not start with 1, 2, 3,… These need to have 2 digits since most portfolios will exceed 9 images and the order will be incorrect (0, 1, 10, 11….)
Image Filenames should also contain your name. You may optionally include a title, but keep the title short. The entire filename should not exceed 30 characters. Typical filenames could be:
00-Artist Statement, 01-John Doe-Dog, 02-John Doe-Cat, 03-John Doe-Mouse…
The artist statement should always start with 00 to be the first one in the sequence. Check your image order in Dropbox (ascending order). If they appear correctly there, then they will be correct in the gallery.
Creating a JPEG Artist Statement
There are several ways to create an text-based artist statement and save it as a JPG file. The most versatile way is to do it in Photoshop or Photoshop Elements using the “Text” tool (T). If you’ve never worked with the text tool it’s advisable to watch a tutorial to understand its functions. (Try Googling “Photoshop Text Tool”.) Here is a sample template (tiff) that can be downloaded and edited in Photoshop.
Download Sample Photoshop Artist Statement.tiff
You can also create an artist statement in Powerpoint (or other slideshow presentation software). However, it is important to save or export your result as a JPEG image. Other image formats such as PDF, Powerpoint (pptx), Word (docx) are not compatible with Lightroom or the Portfolio Project gallery and will not be displayed. Here is a simple Powerpoint template you can download and edit in Powerpoint:
Download Sample Powerpoint Artist Statement.pptx
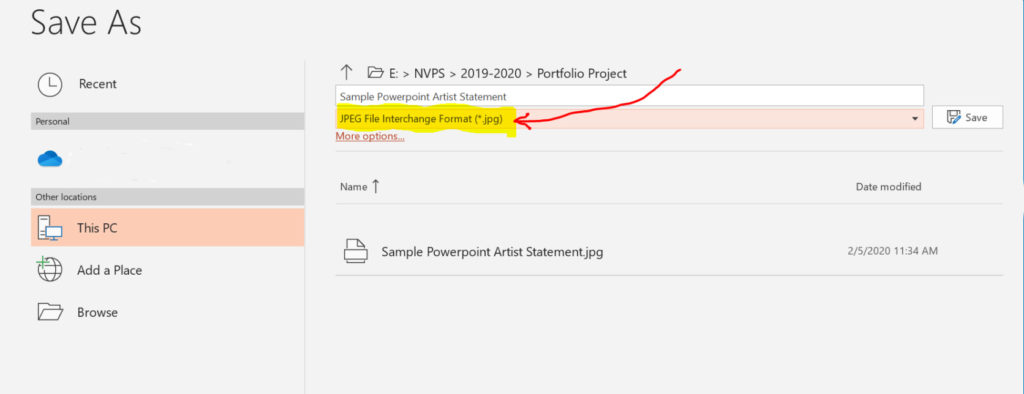
The important thing is to save the file as a JPEG image and not as a pptx file. Select JPEG in the pull-down underneath the filename field. Note, in order to force the size of the artist statement to a 1400 x 1050 pixel image, select Design -> Slide Size -> Custom Slide Size to Width = 14.58 inches and Height = 10.936 inches. This has already been setup in the Sample Powerpoint template above.
Another way to create a JPEG Artist Statement is to create it in your favorite word processor (such as Microsoft Word, MAC Pages, Google Docs, LibreOffice, etc.), then print it to sheet of paper or display it on your computer screen, then photograph the page with your camera. It will still need to be sized properly to display correctly on the club projector, gallery or printed output. It is highly recommended to create this in landscape orientation instead of the portrait layout.
For readability, use a simple sans-serif font, a fairly large font size (24 pt or larger), and a high contrast black text on white background. If you use a BG image, reduce the opacity significantly to maintain readability.

Dropbox Instructions
Instructions for creating a Dropbox account can be found here: https://nvps.org/home/dropbox-instructions-for-portfolios/